Home » 2023
Yearly Archives: 2023
Read These Tips To Find Good Deals For Your Next Vacation.
Traveling is one of the great joys of many people. There is something about going new places, meeting new people and experiencing different cultures, that can broaden your horizons in a way other things can’t. Travel does not have to be expensive nor do you always need to go to exotic places, it just has to be to someplace where you are exposed to different experiences. This article can help you to embrace travel as an important part of life.
Before traveling make sure you get enough sleep. For many people, the few days before their vacation are filled with either stress or excitement, sometimes leading to a lack of sleep. When this happens, you tend to ‘crash’ when you reach your destination, meaning that you waste vacation time because you are already exhausted. A good night’s sleep before traveling will mean that you arrive invigorated and upbeat.
When traveling, it is important to remember to pack only what you need. This rule is most applicable to trips by air, as luggage fees are much higher now than they previously were. Most airports will sell anything you might not have room for and major surrounding cities should as well.
Exercise before you get on the airplane. Long flights are hard on your body. Your body can become cramped and uncomfortable. This is why hitting the gym or at least stretching before boarding a flight can lessen or completely eliminate any cramps.
When traveling by air, be sure to wear light shoes that are extremely comfortable and easy to kick off. You are required to take them off when going through security checks. The number one concern is comfort. You will be sitting a lot, so a great deal of support is unnecessary. A perfect type of footwear for travelling is sandals.
As expressed in the article’s beginning, travel exposes you to many different people, experiences and ways of living. It doesn’t just mean going to exotic places, it can simply be meandering across America, taking in all of the different sights of everyday people. This article seeks to awaken the desire to travel in you.
You can also visit our other websites and post your article.
Bloomp Povidence Healthcare, Santan Valley Pool Service, Little Crew, Santan Valley Pool Service,Carpenter Flooring, Santan Valley Pool Service, Travel Van Lines, All In The Family Moving, My Interstate Movers, Yuma Tow Truck, My Wedding Chair Covers, San Diego Water Heater Installs, Elk-grove-painters, Fontanapaintingco, Dr Judith Lee, My Elder Care Consultant, Adoptions Reunited, San Diego Pergolas And Patios, Cargle Lawn Care, Abilene Tree Services, Hialeah Tree Care, Mango Tree Care, Guelph Lawn And Snow, Mylightingpro, Miami Dade Restoration Services, Red Box Architecture, Showcase Cabinetry And Design, Travel Health Insurance Hub, Beairductcleaning,Easy Solar Pool Heating, Healthcare-America, Van DV Kids Dentistry, Manchester TUC, Northeast HVAC, Browardcountyremodeling, Pressure Washing Oviedo, Blu Note Design, Blu Note Design, Probateradio, Edward Lower Accounting, Edwardloweraccounting, Monty’s Mega Marketing, Mcarpenter Md, Appliance Repair Montreal, Winkler Sprinkler, Americanpieradioshow, Cardiff Window Cleaners, Lampsandlighting, Junk Removal And Storage Solutions For You, Pacifik Travel
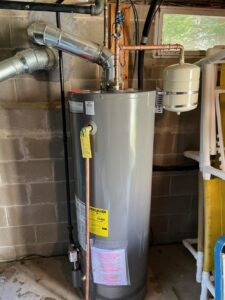
Water Heater Replacement – Why You Should Leave it to the Pros
Water Heater Replacement Denver can be a major undertaking. It’s usually best left to the pros.
Rising energy bills, rusty water, slow leaks, and corroded tank liners are good reasons to replace a hot water heater.
Changing the fuel type is another consideration, and can add to project costs. Adding electrical wiring and gas lines requires the services of an electrician and plumber.
The water heater is one of the most important household appliances. It powers everything from hot showers to laundry and dishes. But, when yours is on the fritz, it can be a major disruption to your family’s routine. It can also be a costly one, as you may have to pay for emergency replacement service.
A new water heater is a considerable investment, and there are many factors that can influence its cost. First, you must determine what kind of heater you want to replace yours with. There are several different options, including tank and tankless models, as well as gas or electric. You will also need to decide between power venting and direct venting. Power venting adds around $300-$600 to your total. Direct venting brings combustion air from outside and exhausts it directly outdoors, adding another $500-$1,000 to your price.
There are also extra expenses to consider if you’re changing the location or converting to a different fuel type. These can include carpentry costs, if needed, and additional labor to move piping. You may also have to spend on a new breaker box and gas line, depending on your installation plan.
A professional plumber will be able to give you an accurate estimate for the cost of your new water heater installation. They will be able to help you choose the best style for your home and budget, as well as install it correctly. In addition, a plumber can help you figure out the right size of the heater to fit your needs.
If your water heater is older and more likely to break down, you should invest in a replacement sooner rather than later. A newer model will be more energy efficient and save you money on your utility bills. It will also be able to hold more water and provide faster heating.
You should also factor in the cost of a new expansion tank, which can run from $100 to $350. The tank helps control pressure and prevents overflow. It is necessary for water heater safety and should be replaced every five years. You should also consider investing in a warranty, which can protect you from expensive repairs.
Energy Efficiency
When shopping for a new water heater, pay attention to the energy efficiency rating. This figure, displayed on a sticker on the unit, indicates how much the model costs to operate annually. A higher number means the model is more efficient.
The type of fuel used to power the unit can also affect its energy efficiency. Gas-powered units with sealed combustion and powered venting offer superior efficiency, as these systems separate combustion air from house air. They also have a fan to assist in exhausting the gases, which helps reduce energy consumption.
Upgrading to a heat pump water heater can also save money on utility bills, as these models use less energy than conventional electric ones. However, they may not work well in cold climates where temperatures drop below freezing.
You can reduce energy usage by installing low-flow showerheads and faucet aerators, and reducing hot water consumption when possible. However, the best way to lower your energy bill is by installing a more efficient water heater. A trained Carter professional can help you select the right model for your home and budget.
If your current unit is old and prone to malfunction, consider upgrading it. Newer models are more reliable and offer better energy efficiency. They also come with longer warranties, so you can be sure that the replacement will last. Look for features like anti-scale devices, which reduce the buildup of mineral scale on heating elements, and brass drain valves, which are more durable than plastic ones.
It’s important to have a plumber install your new water heater, as the labor involved is extensive and complex. It’s also essential to choose a contractor with experience with your particular water heater style. For example, if you’re replacing a tankless system, make sure your installer knows how to install that kind of heater correctly.
A plumber can also help you decide where to locate your new water heater. For maximum efficiency, place it in a warm area with easy access to your kitchen and bathrooms. Ideally, it should be located close to the main water line so that you don’t have to travel a long distance for hot water.
Life Expectancy
Nothing lasts forever, and even the most reliable water heaters have a lifespan that eventually comes to an end. Many homeowners don’t realize when their water heaters are reaching the end of their life expectancy, and they can experience a lot of inconvenience if they wait too long to replace their old water heater. However, you can avoid this inconvenience by keeping an eye out for certain warning signs that your water heater is approaching the end of its lifespan.
The first warning sign is when your hot water starts running out quickly. This is caused by mineral deposits that build up in the tank and prevent it from heating up. You can try a few things to fix the problem, but if you’re constantly experiencing this issue it may be time for a new water heater.
Another sign that your water heater is nearing the end of its lifespan is when you start to notice rust on the surface of the tank. This can be a dangerous issue because it means that the metal is starting to corrode, and this can lead to leaks. If you see rust on the surface of your water heater, it’s important to call a plumber right away to have it replaced.
Another sign of a deteriorating water heater is when you start to hear gurgling noises during use. This is a sign that sediment has built up in the tank, and this can cause the water to become rusty. In addition, a large amount of sediment can also decrease the water heater’s efficiency and cause it to consume more energy.
Another sign that your water heater is getting close to the end of its lifespan is when you start seeing puddles on the floor around it. This is a sign that your water heater is leaking, and it can cause damage to your home and your belongings. Leaks can be repaired, but if you see water on the floor of your house, it’s best to get a professional to take a look at your water heater.
Installation
There are many factors that go into the installation process of a new water heater. It’s important to choose a model that is the right size for your household. If you have a smaller home or live alone, a 40-gallon tank may be enough for your needs. If you have a larger household or live with several people, a 50-gallon or 80-gallon tank may be more suitable. A professional will help you determine the best size for your household.
During the replacement process, you’ll need to shut off the water supply. This is usually done using the water heater’s water shut-off valves, which are usually color-coded (blue for incoming cold water, red for outgoing hot water). After that, you’ll need to drain the old tank. This can be done by attaching a garden hose to the drain valve and then emptying the tank into a bucket or floor drain. Then, you’ll need to disconnect and move the old tank.
Once the tank is moved, you’ll need to install the new water heater and connect the pipes. If you’re replacing the hot water line, you’ll need to add a copper slip coupling and a pair of short, plastic-lined nipples to prevent galvanic corrosion. You’ll also need to solder the new water line to the water heater.
If the water heater is being installed in a new location, it will need to be mounted on a wall. This is typically done with screws and a mount kit that comes with the unit.
Then, you’ll need to install the temperature and pressure relief valve and a discharge line per the manufacturer’s instructions and local code. If you’re changing from an atmospheric vent to a powered direct vent or a natural gas water heater, it is a more complex project and should be handled by a pro.
Before you start working on the water heater, turn off the power to it by switching off the circuit breaker or removing the fuse. Then, carefully remove the junction box cover and connect the electrical wires to the terminals on the water heater. Once all the connections are made, replace the cover and switch on the power to the water heater.
Why Choose Laminate Flooring?
Laminate flooring is an excellent choice for any home. It can look and feel like real hardwood (without the cost) and comes in a wide variety of styles.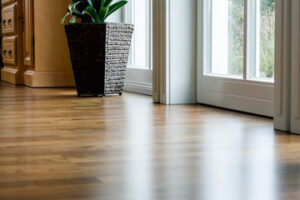
It is a great option for DIY-ers as long as you do your homework and prepare the subfloor properly.
The durability of your laminate flooring is a major consideration when you’re choosing the right option for your home. It’s important to choose a product that can stand up to the wear and tear of daily life, which is why most floors have a variety of durability ratings.
Laminate is a synthetic flooring material that aims to mimic the look of wood, stone, or tile. It’s been around for a few decades, and manufacturers keep improving its durability and quality.
Most laminate floors feature a durable wear layer that can withstand scratches, dents, and stains. Some even come with long warranties that protect against these issues.
This durable wear layer makes laminates a good choice for high-traffic areas, like entry hallways or kitchens, where a high dose of traffic might not be as ideal for hardwood floors. However, it’s important to note that laminate cannot be sanded and refinished, so if the top layer is damaged by heavy wear, it must be replaced.
Aside from this downside, laminate is also relatively easy to maintain if you follow a few simple rules. Mopping once a month with a damp mop is usually sufficient, and you can use any cleaning product that is safe for your floors (no oils, acids, or abrasives).
Another key factor in the durability of laminate is its thickness. Many brands use multiple layers to create the appearance of hardwood, stone, or tile floors. Each layer consists of a core board, a design or image layer, and a protective wear layer that is sealed to the surface.
When choosing the best laminate floor for your needs, you’ll want to research different brands. These companies offer a wide variety of styles and GreenGuard certifications.
To determine the overall durability of a laminate floor, manufacturers test it using a Tabar rotary platform abraser. The test replicates years of wear and tear by putting the flooring through 50 wear cycles to simulate one year of residential use. Once the results are compiled, each floor is assigned an AC rating. The higher the AC rating, the more durable it is.
Laminate flooring is extremely easy to maintain and requires very little work to keep it looking good. It only requires vacuuming and mopping on a regular basis. However, to ensure the best results in cleaning your floors, it is important to use products that are specifically for laminate floor care.
It is also recommended to avoid using abrasive or harsh soap-based cleaning products. These can damage the top layer of the laminate and cause it to lose its shine.
The best way to keep your laminate clean is to establish a cleaning routine and do a deep clean every couple of months. You should also tend to spills and messes as soon as they occur and use rugs or mats in high-traffic areas to prevent scratches and stains.
You should also take precautions to prevent moisture from damaging your laminate. Water can swell the planks and make them warp or rip, so be sure to wipe up any spills immediately.
Similarly, be aware of oil-based stains such as paint, ink, marker, lipstick, or shoe polish, which may not come off easily. If so, acetone nail polish remover will work to get them out. You can also use a pencil eraser to get heel marks and scuffs off the surface.
Another easy way to keep your laminate floors clean is to use a mild cleaner. For tough spots, you can use a window cleaner on a cloth to buff away stubborn grime.
If you have children or pets, consider using a furniture pad to protect your flooring from scratches. You should also place mats at each entrance to collect excess dirt and dust.
Although laminate is relatively easy to clean, it does need to be kept dry. Water can swell the planks or rip them off, so you should always wipe up spills quickly and don’t use a wet mop. You should also be aware of acidic or abrasive products which can damage the laminate’s surface.
Laminate flooring has a wide variety of finishes, colors, and textures that can match the style of any home. It also comes in a variety of different materials and is easy to install.
Compared to hardwood floors, laminate is often cheaper and easier to maintain. It is also more durable, making it great for high-traffic areas.
The variety of laminate flooring available is so vast that it can be overwhelming for the average buyer. But if you know what to look for, you can find the perfect floor for your home and budget.
One of the most popular laminate flooring types is the pre-glued variation. This type is quick and simple to install, and it has a double-lock system that connects to the floor almost instantly.
It is also less susceptible to scratching than other types of laminate and is a good choice for anyone who wants a hard-wearing floor that is low maintenance and affordable.
Some varieties of laminate also come in wood-look designs that resemble real wooden planks. This is particularly popular with consumers who prefer a more authentic hardwood look.
Many laminate floors are also waterproof, which makes them ideal for bathrooms and basements. Depending on the material and the quality of the laminate, it may also be resistant to humidity.
However, if you live in an area where it can be very humid or wet, it is advisable to avoid laminate flooring. It is also a good idea to get a foam underlay to prevent any moisture from seeping into the floor.
Another popular option is the fold-and-lay variation. This method of joining two laminate boards is a great alternative to tongue-and-groove joinery. It involves a fold that is made by angling the boards inwards. This allows the boards to be held tightly together without any movement.
These laminates are very easy to clean and are a good choice for families with small children or pets. They are also stain-resistant and will not damage your carpet.
Some of the more expensive laminates have a layer of aluminum oxide to make them more durable. These floors are also more stain-resistant, which is a bonus for homeowners who have pets or children.
Laminate flooring is one of the easiest types of floor coverings to install. Its click-and-lock tongue-and-groove system makes it easy to install over a variety of subfloors without glue or nails. It also is a great choice for those looking for an eco-friendly option that doesn’t require trees to be cut down.
Before installing laminate floors, acclimate them to the temperature and humidity of the room they will be installed in. This will help the planks fit together properly and reduce the risk of buckling and warping.
To begin installing the laminate flooring, remove the baseboards and trim around the perimeter of the room as well as any heating resistors or air return duct covers. Then, clean the floor thoroughly to remove any debris or dust.
After the floor is clean, use the flooring cutter to cut the first and last planks of each row. Be sure to stagger the end joints of adjacent boards by at least six inches, which will provide additional stability and a more authentic appearance.
When you have a full row of planks in place, join the tongue side to the groove side using a pull bar from the installation kit or a hammer and tapping block. Start a new row by matching the tongue side to the groove side of the next board, and continue until you reach the end of the row.
For a seamless and professional-looking installation, ensure that all of the planks are measured correctly and cut to length as needed. This is especially important for larger rooms, as a single mistake in measurement can result in uneven or unattractive flooring.
Once you have the planks cut to length, begin laying the laminate flooring by lining the tongue side of the first row up with the wall. Then, begin a second row by matching the tongue side of the next row to the wall and aligning them together. Lastly, cut the last plank in each row to length and save the scraps.
After the flooring is laid, you can add thresholds and baseboard molding to finish off the edges. This will help to eliminate the expansion gap and give the floor a more authentic look.
Slab Leaks
Slab leaks occur when the water pipes that supply your house are leaking underneath your foundation. Often, homeowners don’t realize they have a slab leak until it causes major damage to their property and costs them a fortune in repairs.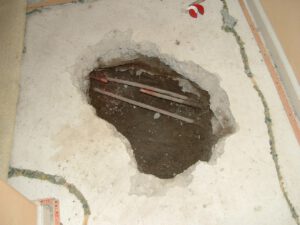
Luckily, there are some key signs you can watch for that will tell you whether or not you have a slab leak. If you notice one or all of these signs, you should get it fixed immediately!
A slab leak in the pipes that run underneath your home’s concrete foundation can cause a dramatic decrease in water pressure. This can make it difficult to shower, wash dishes, or even get a hot bath.
Low water pressure is a common problem for homes with old pipes, especially those made of galvanized steel. It can also be caused by issues at the water treatment plant, such as when construction temporarily reduces the amount of water that your city can deliver to homes.
Another reason why water pressure may go down is if your plumbing isn’t properly insulated. This can cause rust and moisture to build up in the pipe, which restricts the flow of water.
Slab leaks can also be caused by a poor pH balance in the water or contaminants that corrode copper pipes. If these factors are not corrected, you could end up with a leak in the pipes that run under your home’s foundation.
One of the best ways to detect a leak is to have your home inspected by a licensed professional. This can help prevent a costly slab leak from happening in the first place.
Once a plumber has identified the problem, they can then repair the leak. This can often be done without breaking through your home’s concrete foundation.
A plumber can use a variety of tools to locate a slab leak, including acoustic discs and ground microphones that can hear the sounds that escaping water makes. These tools can help narrow down the location of the leak without cutting through your concrete slab foundation.
The water that leaks through a home’s slab can cause damage to its flooring. Carpet can become damp and dark, while wood flooring develops warped floorboards. This is a common effect of slab leaks and can lead to costly repair or replacement costs.
Cupping is the most mild form of floor damage and can usually be remedied by restoring proper humidity to the room. The result is a slight buckling along the length of each plank, which can be flattened with heavy objects or nailed down and covered up with caulk.
If this doesn’t work, however, you might be dealing with serious damage, which will require major repairs or complete replacement. Fortunately, cupping can often be fixed in some cases by removing the damaged boards and replacing them with new ones.
Warping is a more serious issue, and it can be harder to correct. When wood is warped, the boards are unable to rest flat on the subfloor. The edges of the boards can also start to buckle, and the floors may even begin to split at the edges.
When this happens, you need to call in professional help immediately. The best thing to do is enlist a plumber who can assess the situation and fix the problem before it gets worse.
Slab leaks can cause less water pressure to flow through your pipes. This is especially true when the leak originates from underneath the concrete foundation of your house.
This means that the water pressure at your faucets and other fixtures will be lower than normal, which can also make your water bill skyrocket. This is a clear sign that you have a slab leak, so be sure to contact a plumber if you notice this issue.
How to Go About Interior House Painting
Interior house painting is an important process as it is used for a number of reasons. It helps to protect the building from damage and improves the look of the building.
 Painting your interior walls can be a fun and rewarding do-it-yourself project. It’s a great way to brighten up your home. But you’ll need to consider a few important issues before deciding whether to do it yourself or hire a pro. One major benefit to hiring a professional is that they’ll be able to finish your paint job faster. Painting has the equipment, knowledge, and experience to finish the job quickly. They can complete the work in a fraction of the time a homeowner would need to do it.
If you plan on painting a room in your home, you’ll want to know the proper steps to take before you start. A working checklist will help you anticipate any problems and give you a handy reference point to return to when necessary. The first step in preparing surfaces for interior house painting is a thorough clean. Use a combination of soap and water and a mild detergent to remove any lingering dirt or dust. This will ensure a smoother and more pleasant outcome.
You will also want to protect your floors and furniture from paint splashes, and you might even want to invest in a drop-sheet. These will also protect your windows and skirting boards. Before you can begin the actual painting, you’ll need to fix any cracks and crevices. In most cases, this will require the use of a painter’s tape. Tape will help keep the edges of the window sills, skirting boards, and utility heads from getting splattered with paint.
Painting interiors of homes can be a major expense. Depending on the size of your house, the cost can range from a few hundred dollars to several thousand. There are many factors to consider when determining your budget. You may decide to hire a professional painter or you can tackle the job yourself.
If you choose to hire a professional, make sure to ask about the average costs for painting an entire home. The cost can vary greatly depending on the size and layout of your property. For example, a single room with high ceilings will cost more than a small bedroom.
If you’re looking to save money, you should look for high-quality paints. These paints are more durable and last longer. They also tend to be easier to clean. The cost of paint can also vary based on the surface. Oil-based paints tend to be more expensive. Latex-based paints are easier to work with. Glossier paints are more expensive. You can expect to pay between $2 and $6 per square foot to paint your home. This includes the cost of supplies and labor.
The average cost to paint an entire interior of a home is between $1,500 and $7,500. Depending on the size of the home, the price can be even higher. Painting a home interior is a project that requires many different materials and supplies. These items include brushes, tape, and painting trays. It’s also important to consider the amount of time it will take to complete the project. Interior painters may charge differently, depending on the level of detail, the number of colors used, and the size of the home. Most professional painters charge between $2 and $6 per square foot. If the house is a rental, make sure to check with your landlord and landlord’s management company.
A common misconception is that painting a home is a DIY job. While it’s true that homeowners can do their own work, the majority of interior painting projects require the services of a professional. Painting an interior can cost between $3 to $15 per gallon. However, it’s important to remember that the quality of the paint will also affect the cost. Higher-end paint brands will cost more, but they’ll last longer and be easier to clean.
Another advantage to hiring a professional is that they can ensure your safety. Paint fumes can cause headaches, dizziness, and breathing problems. Also, painting from ladders can be dangerous. You could easily fall from one if you’re not experienced with ladders. The final cost of a painting job will be based on labor, materials, and accessories. Labor costs roughly 80 to 85 percent of the total cost.